EndoscopicAssisted Surgery in Oral and Maxillofacial Surgery

What is Endoscopic-Assisted Surgery?
Endoscopic-assisted surgery is an advanced and minimally invasive technique utilized in oral and maxillofacial surgery to address complex conditions with precision and reduced recovery times. This cutting-edge approach employs a small camera, or endoscope, which allows surgeons to visualize intricate areas of the face, jaw, and skull through small incisions.
Where is Endoscopic Surgery Used in Oral and Maxillofacial Surgery?
Endoscopic-assisted surgery is versatile and applied in various procedures, including:
- Temporomandibular Joint (TMJ) Surgery: Used to diagnose and treat TMJ disorders with minimal invasion.
- Facial Trauma Repair: Assists in the precise fixation of facial fractures with minimal incisions. By using this approach, skin incisions can often be avoided, thereby reducing skin scarring and the risk of facial nerve injury.
- Treatment of Cysts and Tumors: Enables the safe removal of cysts and benign tumors in sensitive regions.
- Sinus Surgery: Enhances the management of maxillary sinus conditions.
- Removal of Impacted or Displaced Teeth: Effectively manages complex cases, such as displaced third molars in hard-to-reach areas like the infratemporal fossa.

What are the Advantages of Endoscopic-Assisted Surgery?
- Minimally Invasive: Unlike traditional open surgeries, endoscopic-assisted procedures require smaller incisions, resulting in minimal scarring and reduced post-operative discomfort.
- Enhanced Visualization: The high-definition visualization provided by the endoscope enables surgeons to navigate and treat challenging anatomical areas with greater accuracy.
- Faster Recovery: With less tissue disruption, patients often experience quicker healing and shorter hospital stays.
- Reduced Risks: The precision of this technique minimizes the risk of complications, such as damage to surrounding nerves and tissues.
Dr. Özgür Erdoğan’s experience with endoscopic-assisted surgery began during his fellowship at the Department of Oral and Maxillofacial Surgery at Freiburg University,Germany in 2009. It was here that he was introduced to the potential of using endoscopy in oral and maxillofacial procedures. Initially, Dr. Erdoğan utilized endoscopic-assisted techniques primarily for fracture repairs, where the minimally invasive approach proved invaluable in achieving precise and reliable outcomes while minimizing patient discomfort. Over time, he extended its application to other areas of oral surgery. The photographs shows a moment during one of Dr. Erdoğan’s procedures: the endoscopic-assisted removal of a displaced maxillary third molar from the infraorbital fossa.
Publications by Dr. Özgür Erdoğan
You may find Dr. Erdoğan’s publications on Endoscopic Asissted Surgery subject below.
1. Transoral endoscopic assisted reduction and internal fixation of mandibular condylar neck fractures with short condylar segment. Journal of Craniomaxillofac Surg. 2024 Aug;52(8):914-921. (Abdelazeem MH, Cakir M, Erdogan O)
2. Transoral Endoscopic-Assisted Reduction and Internal Fixation of Mandibular Condylar Fractures in Children. Journal of Oral Maxillofacial Surgery. 2023 May;81(5):566-574. (Abdelazeem MH, Aboelela S, Erdogan O)
3. A modified endoscopic technique for the repair of isolated orbital floor fractures. European Journal of Plastic Surgery 43, 491–494. 2020 (Abdelazem MH, Erdogan O)
4. Endoscopically Assisted Transoral Gap Arthroplasty of the Temporomandibular Joint Ankylosis in a Pediatric Patient. Journal of Craniofacial Surgery 2018 Sep;29(6) (Abdelazeem MH, Erdogan O, Awad TA)
Digitally Guided Implant Surgery
Digitally Manufactured Surgical Guide Fitting
Postoperative Radiograph Showing Correct Implant Positions
Execution of the Procedure with the Surgical Guide

Digital surgical guides for dental implant surgery bring a new level of precision and predictability to the procedure. These guides are custom-made based on 3D imaging and advanced planning software, ensuring implants are placed with optimal accuracy, minimizing risks, and enhancing patient safety. With digital guides, the placement process is faster, less invasive, and requires smaller incisions, leading to reduced discomfort and quicker healing times. Additionally, digital planning allows for better visualization of complex anatomy, enabling personalized treatment plans tailored to each patient’s unique needs. This technology elevates the quality and outcomes of dental implant procedures, making it an ideal choice for patients seeking the best in dental care.
Execution of the Procedure with the Surgical Guide
Postoperative Radiograph Showing Correct Implant Positions
Execution of the Procedure with the Surgical Guide
Dental implant surgery with digital surgical guides begins with a detailed 3D scan of the patient’s mouth, allowing for precise visualization of the jawbone, nerves, and other critical structures. Using specialized software, the ideal implant placement is planned digitally, considering the patient’s specific anatomy and prosthetic requirements. Once the plan is finalized, a custom guide is 3D-printed, designed to fit securely in the patient’s mouth. During surgery, this guide directs the placement of the implant to match the exact planned position, angle, and depth. This approach enhances accuracy, reduces the need for large incisions, and streamlines the procedure, promoting faster recovery and more predictable outcomes.
Postoperative Radiograph Showing Correct Implant Positions
Postoperative Radiograph Showing Correct Implant Positions
Postoperative Radiograph Showing Correct Implant Positions
Digital surgical guides are particularly indicated for complex implant cases, where precise positioning is critical, such as in patients with limited bone structure, proximity to nerves, or aesthetic demands in the front teeth. They are also ideal for full-arch reconstructions and cases with multiple implants, ensuring accuracy and minimizing complications. As technology advances, the future of these guides looks promising. Enhanced AI-driven planning, improved materials, and seamless integration with digital workflows will make surgical guides even more adaptable, efficient, and accessible. With ongoing innovation, digital guides are set to become a standard in implant dentistry, ensuring high precision and superior patient outcomes.
Assisted Eruption of Impacted Teeth by Orthodontic Traction

In this case, we treated impacted teeth by carefully extracting specific teeth and applying orthodontic traction bands to the impacted teeth. This approach guides the impacted teeth to gradually move into their proper positions within the jaw. The images show the initial placement, the process, and the successful eruption of the teeth. This method not only preserves natural teeth but also helps achieve functional alignment without extensive surgical intervention.
Impacted teeth, especially canines and premolars, are a common clinical challenge that may result from lack of space, abnormal tooth positioning, or developmental disturbances. If left untreated, these teeth can cause root resorption of adjacent teeth, cyst formation, or compromise both function and esthetics. Early diagnosis and intervention are essential to prevent these complications and to guide the impacted teeth into the dental arch before they become ankylosed or cause damage to nearby structures.
Our treatment approach combines surgical exposure and orthodontic traction in a minimally invasive, controlled manner. By selectively removing obstacles and applying gentle orthodontic force over time, we allow the impacted teeth to erupt into functional alignment. This interdisciplinary method, performed in collaboration with experienced orthodontists, enables us to avoid more aggressive surgical procedures and maintain the patient’s own teeth with long-term functional and aesthetic outcomes.
Sinus Floor Elevation with Simultaneous Implant Placement
Sinus Floor Elevation
Sinus floor elevation is a surgical procedure used when dental implants are planned for the upper back jaw, but there isn’t enough bone height to support them. Over time, the bone in this area may shrink due to tooth loss, or the natural anatomy of the sinus may limit the available bone. In such cases, the floor of the sinus is lifted, and bone graft material is placed to create a solid foundation for future implant placement.
This procedure is typically performed under local or general anesthesia. The surgeon carefully lifts the sinus membrane and fills the space beneath it with bone graft material. In some cases, implants can be placed during the same session; in others, a few months of healing may be needed before implant placement. Sinus floor grafting is a safe and widely used technique that significantly improves the success of dental implants. When planned properly and performed by an experienced surgeon, it delivers both functional and aesthetic results.
This patient was admitted for a full mouth restoration. He requested crown restorations for the front teeth and implant-supported crowns for the back areas. One challenging condition was the limited bone volume available in the left and right upper jaw.
After the Surgery
There are two main techniques used to elevate the sinus floor when placing dental implants in the upper back jaw: the lateral window technique and the transcrestal (or crestal) technique. The lateral window technique involves creating a small opening on the side wall of the upper jaw to directly access and gently lift the sinus membrane. Bone graft material is then placed under the membrane to increase bone height. This method is typically used in cases with severe bone loss or when a large amount of bone grafting is needed.
The transcrestal technique, on the other hand, is a less invasive approach performed through the implant site itself, without opening a side window. A special instrument is used to carefully lift the sinus membrane through the top of the ridge, and bone graft material is inserted before or during implant placement. This method is generally preferred when the remaining bone height is moderately sufficient. Both techniques are safe and effective, and the choice depends on individual anatomy and clinical requirements.
In our patient, bone deficiencies in the right and left upper jaw were corrected in a single session under general anesthesia using the sinus floor elevation technique with a lateral window approach. Implants were placed simultaneously in the upper jaw, along with three additional implants inserted in the lower jaw.
NEW SMILE DESIGNED AND GENERATED

Initial Appearance
Initial Appearance
Initial Appearance
Our patient presented with several aesthetic and functional concerns affecting the upper front region of the smile. Most notably, she exhibited a pronounced gummy smile, in which an excessive amount of gum tissue was exposed while smiling. This disproportion between teeth and gingiva disrupted the overall balance and harmony of the smile.
Our patient presented with several aesthetic and functional concerns affecting the upper front region of the smile. Most notably, she exhibited a pronounced gummy smile, in which an excessive amount of gum tissue was exposed while smiling. This disproportion between teeth and gingiva disrupted the overall balance and harmony of the smile. Additionally, the maxillary anterior teeth were misaligned and uneven, with irregular incisal edges and varying tooth lengths that further emphasized the asymmetry. These issues not only detracted from the visual appeal but also impacted phonetics and occlusion.
Beyond the aesthetic impact, the underlying dental and periodontal architecture lacked uniformity. The gingival contours were inconsistent, and some teeth showed signs of wear and discoloration. The patient expressed dissatisfaction with the visibility of her gums, the crooked appearance of her front teeth, and the lack of confidence she felt when smiling. After thorough clinical and radiographic evaluation, it was clear that a multidisciplinary treatment approach would be necessary to address both the soft tissue and restorative needs of this case.
Final Appearance
Initial Appearance
Initial Appearance
Following comprehensive treatment planning, we carried out a series of procedures aimed at achieving an optimal and long-lasting result. The first step involved gingivoplasty, a minimally invasive surgical technique used to contour and reshape the gum line. This allowed us to create a more harmonious and proportionate gingival display, re
Following comprehensive treatment planning, we carried out a series of procedures aimed at achieving an optimal and long-lasting result. The first step involved gingivoplasty, a minimally invasive surgical technique used to contour and reshape the gum line. This allowed us to create a more harmonious and proportionate gingival display, reducing the excessive gum exposure while establishing a symmetrical frame for the upper front teeth. Careful soft tissue management was essential to ensure stable and aesthetically pleasing healing outcomes.
To correct the tooth alignment and restore natural proportions, the upper front teeth were restored with Emax crowns, custom-designed using Digital Smile Design (DSD) technology. This digital planning method allowed for precise evaluation of tooth proportions, smile line, and facial integration before beginning the restorative phase. The final outcome demonstrates not only a significant visual transformation but also enhanced function, phonetics, and patient satisfaction. The result is a confident, youthful smile that blends seamlessly with the patient’s facial aesthetics, offering both beauty and long-term durability.
Condylar Neck Fracture (No‑Scar Jaw Joint Fracture Repair)
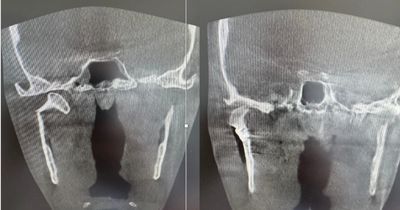
Right Condylar Neck (Before & After) What happened?
Our patient suffered a break in the temporomandibular joint part of the lower jaw on the right side (the condylar neck). This fracture made it painful to open the mouth and chew.
Our solution — all from inside the mouth
Instead of making a cut on the skin, we reached the broken bone through a small opening inside the cheek (transoral approach). The pieces were gently returned to their normal position and secured with tiny titanium plates and screws. Because everything was done from inside, there are no facial scars.
Results you can see
Left image: before surgery – the broken condyle is tilted and out of place.
Right image: after surgery – the bone is straight, solidly fixed, and the joint position is restored.
Recovery at a glance
1-2 weeks: Soft diet & gentle mouth opening; Mild swelling, managed with ice & pain tablets;Gradual physiotherapy
2–4 weeks: Jaw exercises to regain full opening;Return to normal eating
4. week: Comfortable chewing, no visible scars
Key benefits of this technique
No external cuts → no visible scars
Shorter surgery time and lower infection risk
Stable fixation allows quicker return to normal jaw function
“Within a month I was eating normally again—and no one can tell I ever had surgery.” – Our patient
Nerve Injury in Wisdom Tooth(Mandibular Third Molar) Surgery
Understanding the Risk of Nerve Injury in Wisdom Tooth (Mandibular Third Molar) Surgery
Removing impacted mandibular third molars (lower wisdom teeth) is one of the most common procedures in oral and maxillofacial surgery. While generally safe, like any surgery, it carries certain risks, one of the most important being injury to the inferior alveolar nerve (IAN).
What is the Inferior Alveolar Nerve?
The inferior alveolar nerve runs inside your lower jawbone and supplies sensation to the lower lip, chin, and lower teeth. When an impacted wisdom tooth lies close to or touches this nerve, surgical removal can pose a risk of temporary or (very rarely) permanent numbness in these areas.
What Happens If the Nerve Is Injured?
- Temporary numbness or tingling (paresthesia) is the most common presentation. It can last from a few days to several weeks or months.
- In most cases, the nerve heals gradually, and sensation returns fully.
- Permanent injury is rare, especially when proper techniques and diagnostic tools are used, but in a small number of cases, some degree of numbness may persist.
How Do We Minimize This Risk?
At our clinic, we take multiple precautions to reduce the risk of nerve injury:
- Pre-operative imaging with CBCT (3D imaging) allows us to see the exact position of the tooth and its relation to the nerve.
- Surgical planning is personalized depending on tooth anatomy, depth, and nerve proximity.
- All surgeries are performed under good illumination and with precision instrumentation, following evidence-based protocols.
Prof. Dr. Özgür Erdoğan has been performing lower wisdom tooth surgeries for more than 20 years, both in academic hospitals and private practice. Our approach is based on clinical research and best practices in oral surgery. Some of the published scientific studies Dr. Erdoğan has co-authored on this topic include:
- Erdoğan Ö, Tatlı U, Üstün Y, Damlar İ. Influence of two different flap designs on the sequelae of mandibular third molar surgery. Oral Maxillofac Surg. 2011;15(3):147–152.
- Üstün Y, Erdoğan Ö, et al. Comparison of two doses of methylprednisolone on postoperative pain, swelling, and trismus after third molar surgery. OOOO Journal. 2003;96(5):535.
These studies contribute to our understanding of how surgical techniques and medications can impact recovery and minimize complications, including nerve-related issues.
What You Should Know as a Patient
Before any procedure, I will:
- Review your imaging with you in detail.
- Discuss all risks and benefits clearly.
- Help you make an informed decision that prioritizes your safety and comfort.
The panoramic radiograph presented above depicts a deeply impacted wisdom tooth that was extracted without nerve injury at our clinic.
If you have questions or concerns about your wisdom tooth surgery—or if you’d like to schedule an evaluation—you are welcome to contact us directly via the Contact section of this website.
